Mini Santa Hat Cheesecakes Recipe
Introduction
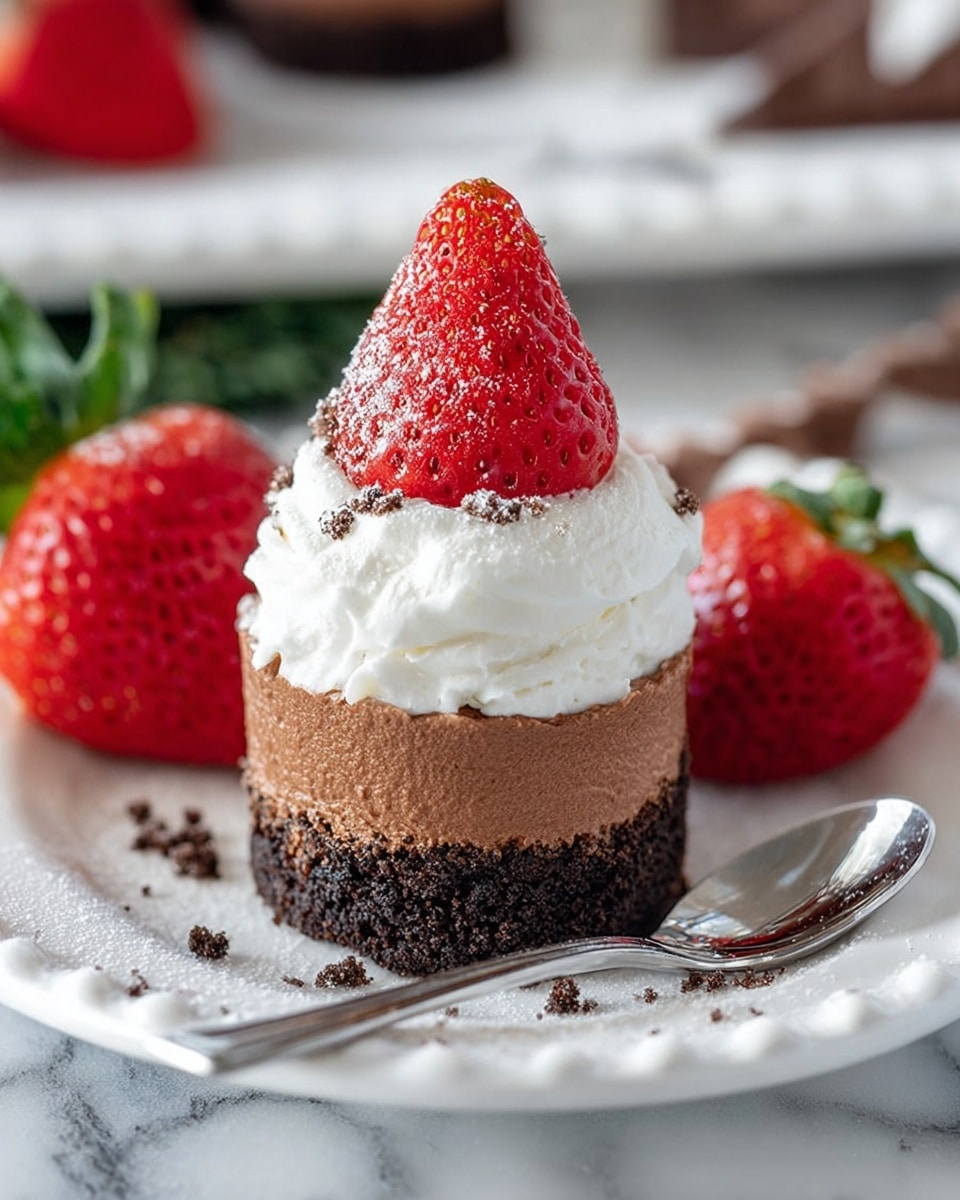
These Mini Santa Hat Cheesecakes are a festive and adorable treat perfect for holiday gatherings. Each bite-sized cheesecake features a creamy eggnog-flavored filling on a chocolate cookie crust, topped with whipped cream and a strawberry “hat.” They’re both delightful to look at and delicious to enjoy.

Ingredients
- 10 chocolate sandwich cookies (see note)
- 2 Tbsp unsalted butter (melted)
- 1/2 Tbsp granulated sugar
- 12 oz cream cheese (softened)
- 1/2 cup granulated sugar
- 1/2 cup eggnog
- 1 Tbsp all-purpose flour
- 1/2 tsp vanilla extract
- 1/4 tsp salt
- 1 large egg
- 1/2 cup heavy cream
- 2 Tbsp powdered sugar
- 12 strawberries
Instructions
- Step 1: Preheat your oven to 350°F and lightly grease a mini cheesecake pan.
- Step 2: In a food processor, blend the chocolate sandwich cookies until fine crumbs remain. Mix the crumbs with melted butter and 1/2 tablespoon granulated sugar. Divide this crust mixture evenly among the cheesecake cavities, pressing firmly to form an even base. Bake for 5 minutes.
- Step 3: Lower the oven temperature to 325°F.
- Step 4: In a large bowl or stand mixer, beat the softened cream cheese and 1/2 cup granulated sugar until smooth and fluffy. With the mixer on low, slowly add eggnog, flour, vanilla, and salt. Increase speed and mix until smooth without lumps. Beat in the egg until fully incorporated.
- Step 5: Spoon the batter evenly into the cheesecake cavities, about 1 to 1¼ medium scoops each. Bake for 15–18 minutes, or until the cheesecakes are set but still slightly jiggly in the center.
- Step 6: Let the cheesecakes cool in the pan on a wire rack until they reach room temperature. Then refrigerate overnight or until fully chilled.
- Step 7: While cheesecakes chill, beat heavy cream and powdered sugar in a medium bowl until stiff peaks form. Cover and keep chilled until ready to use.
- Step 8: Carefully remove the cheesecakes from the pan, lifting them out by removing the pan discs from underneath. Top each cheesecake with a dollop of whipped cream and place a strawberry on top to resemble a Santa hat. Optionally, dust with powdered sugar for a snowy effect.
Tips & Variations
- Use fresh, firm strawberries for the best shape and appearance as Santa hats.
- Swap eggnog for regular milk or cream if you prefer a less seasonal flavor.
- Press the crust firmly and evenly to prevent cracking during baking.
- For a festive touch, drizzle melted white chocolate over the finished cheesecakes.
- If you don’t have a mini cheesecake pan, mini muffin tins lined with paper liners can also work, though the presentation may differ.
Storage
Store the mini cheesecakes covered in the refrigerator for up to 3 days. Keep the whipped cream topping separate until just before serving for best texture. To reheat slightly, remove from the fridge and let sit at room temperature for 10–15 minutes before serving.
How to Serve
Serve this delicious recipe with your favorite sides.
FAQs
Can I make these cheesecakes ahead of time?
Yes, you can prepare and refrigerate them overnight or up to 2 days in advance. Add the whipped cream and strawberries just before serving to keep them fresh and vibrant.
What can I use if I don’t have eggnog?
You can substitute eggnog with an equal amount of whole milk or heavy cream mixed with a pinch of nutmeg and cinnamon to mimic the flavor.
PrintMini Santa Hat Cheesecakes Recipe

Mini Santa Hat Cheesecakes are festive, individual cheesecakes made with a chocolate cookie crust, creamy eggnog-spiked filling, and topped with whipped cream and fresh strawberries to resemble Santa hats. These delightful treats are perfect for holiday gatherings and combine the richness of cheesecake with seasonal flavors in a cute and tasty presentation.
- Prep Time: 20 minutes
- Cook Time: 23 minutes
- Total Time: 12 hours 43 minutes
- Yield: 12 mini cheesecakes 1x
- Category: Dessert
- Method: Baking
- Cuisine: American
- Diet: Vegetarian
Ingredients
Crust
- 10 Chocolate sandwich cookies
- 2 Tbsp unsalted butter, melted
- 1/2 Tbsp granulated sugar
Cheesecake Filling
- 12 oz cream cheese, softened
- 1/2 cup granulated sugar
- 1/2 cup eggnog
- 1 Tbsp all purpose flour
- 1/2 tsp vanilla extract
- 1/4 tsp salt
- 1 large egg
Whipped Cream Topping
- 1/2 cup heavy cream
- 2 Tbsp powdered sugar
Garnish
- 12 Strawberries
- Optional: powdered sugar for dusting
Instructions
- Preheat Oven and Prepare Pan: Preheat your oven to 350°F. Lightly grease a mini cheesecake pan to ensure easy removal of the cheesecakes after baking.
- Make the Crust: Using a food processor, pulse the chocolate sandwich cookies until fine crumbs form. Mix these crumbs thoroughly with melted butter and granulated sugar. Divide the crumb mixture evenly among the cheesecake pan cavities, pressing each firmly with a small cookie scoop to form an even, compact crust layer. Bake the crusts for 5 minutes to set.
- Adjust Oven Temperature: Reduce the oven temperature to 325°F in preparation for baking the filling.
- Prepare the Cheesecake Filling: In a large bowl or stand mixer, beat softened cream cheese with granulated sugar until fluffy and smooth. With the mixer on low, slowly incorporate the eggnog, all purpose flour, vanilla extract, and salt to combine. Gradually increase the mixer speed until the mixture is smooth and lump-free. Beat in the egg until fully blended, ensuring no streaks remain.
- Fill and Bake Cheesecakes: Using a medium scoop, distribute the batter evenly over the pre-baked crusts in the pan, adding about 1¼ scoops per cavity to fill. Bake for 15-18 minutes or until the cheesecakes are set but still slightly jiggly in the center.
- Cool and Chill: Let the cheesecakes cool in the pan on a wire rack to room temperature. Then transfer them to the refrigerator to chill overnight or until thoroughly chilled.
- Make Whipped Cream Topping: In a medium bowl, beat heavy cream with powdered sugar until stiff peaks form. Cover and keep chilled until ready to assemble.
- Assemble Mini Santa Hats: Carefully remove the chilled cheesecakes from the pan by lifting out each individual cheesecake disc with the crust. Top each cheesecake with a generous dollop of whipped cream and place a whole strawberry on top to mimic a Santa hat. Optionally, dust with powdered sugar for a snowy effect. Serve chilled.
Notes
- Ensure the cream cheese is at room temperature for a smooth batter without lumps.
- Do not overbake the cheesecakes; they should be set but slightly jiggly in the center to avoid cracking.
- Chilling overnight helps the flavors meld and the texture to firm up for easier removal from the pan.
- Use fresh, firm strawberries for the best appearance and taste.
- Optional powdered sugar dusting adds a festive snowy look but can be omitted.
Keywords: mini cheesecake, holiday dessert, Santa hat cheesecake, Christmas dessert, eggnog cheesecake, strawberry topping, festive treats