No Bake Chocolate Peanut Butter Oreo Dessert Recipe
Introduction
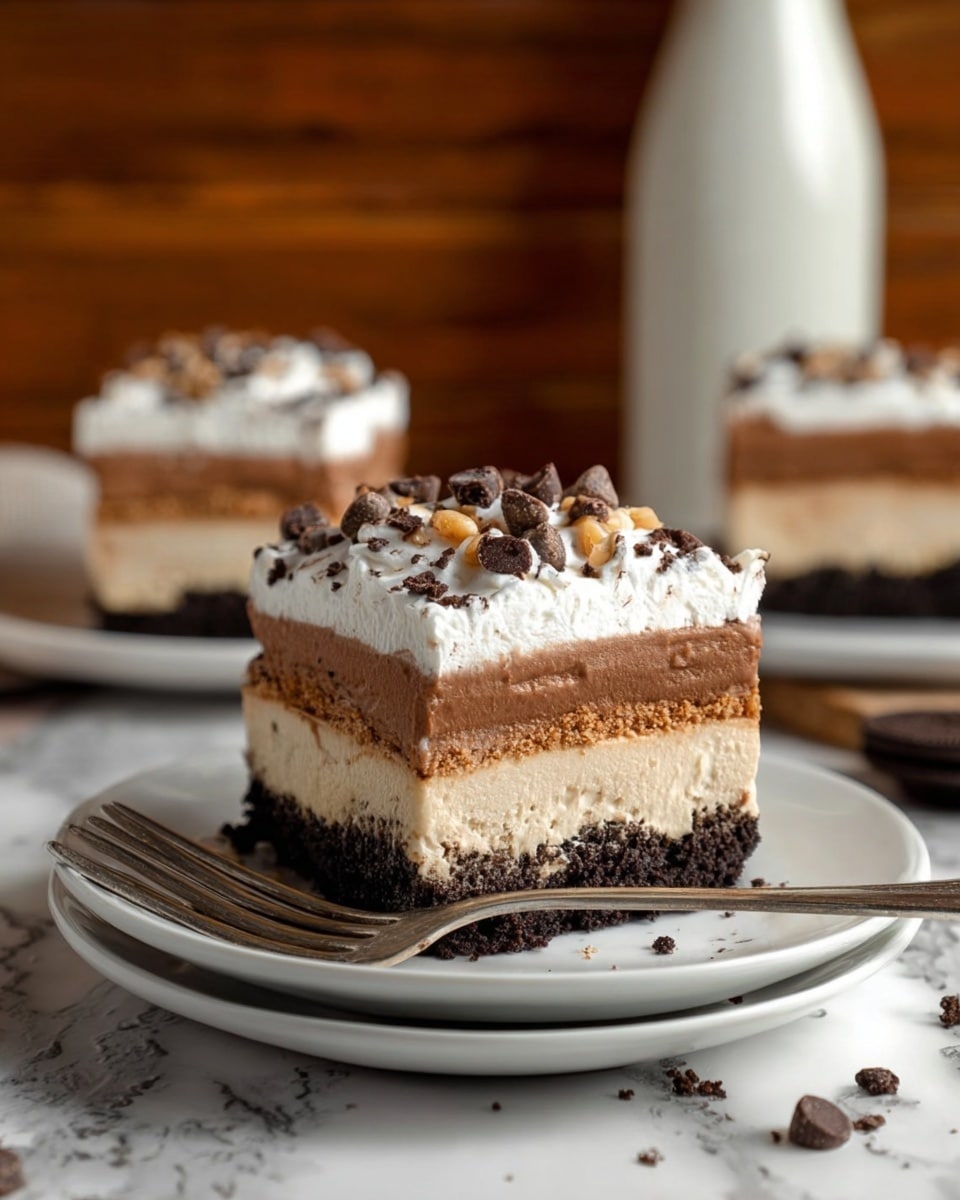
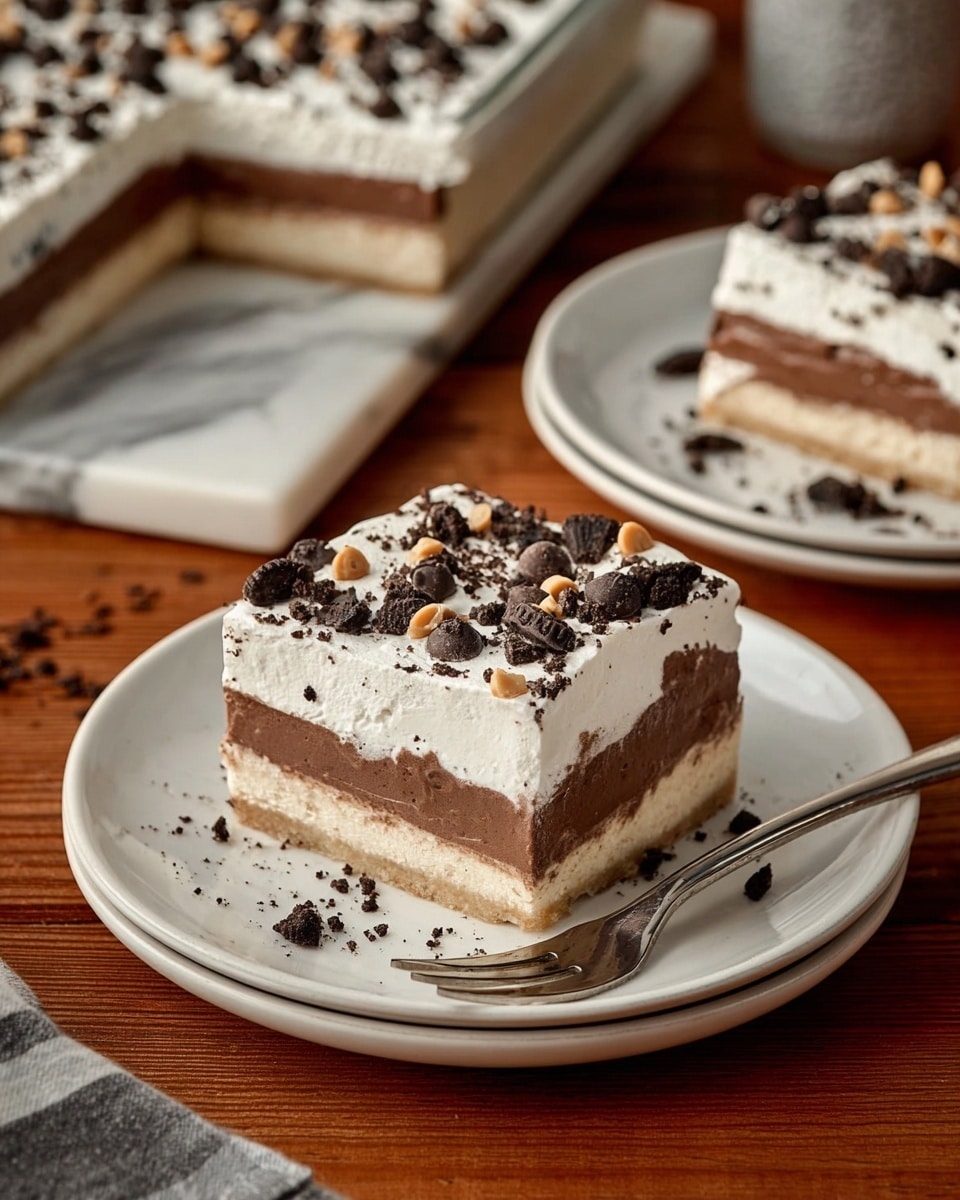
This No Bake Chocolate Peanut Butter Oreo Dessert is a rich and creamy treat that layers classic flavors in a simple, refrigerated format. Combining chocolate, peanut butter, and Oreo crumbs, it’s a crowd-pleaser perfect for gatherings or anytime you want an indulgent no-bake delight.
Ingredients
- 12 oz milk chocolate chips, divided
- 3 1/2 cups milk
- 1 package Oreos (14.3 oz, chocolate cream recommended)
- 16 oz cream cheese, divided (room temperature)
- 1 box Instant Vanilla Pudding (3.4 oz)
- 1 cup creamy peanut butter
- 1 box Instant Chocolate Pudding (3.4 oz)
- 12 oz whipped topping
Instructions
- Step 1: In a food processor, pulse the Oreos until they become smooth crumbs. Set aside.
- Step 2: In a small bowl, combine half of the chocolate chips (6 oz) with 1/4 cup milk.
- Step 3: Microwave the mixture until the chocolate chips melt, stirring until smooth. Let it cool.
- Step 4: Spread one-third of the crushed Oreos evenly on the bottom of a 9×13 pan and press down with a fork to create an even layer.
- Step 5: For the peanut butter layer, beat 8 oz cream cheese in a medium bowl until smooth. Add the vanilla pudding mix and peanut butter, blending until smooth. Slowly pour in 1 3/4 cups milk and continue mixing. Spread this mixture over the Oreo crumb layer.
- Step 6: Spread another one-third of the Oreo crumbs on top of the peanut butter layer.
- Step 7: For the chocolate layer, beat the remaining 8 oz cream cheese until smooth. Add the chocolate pudding mix, cooled chocolate sauce from step 3, and 1 1/2 cups milk. Beat until fully combined. Spread this over the Oreo crumb layer.
- Step 8: Spread the last one-third of the Oreo mixture over the chocolate layer.
- Step 9: Evenly spread the whipped topping over the final Oreo layer.
- Step 10: Optionally, garnish with chocolate chips, shaved chocolate, peanuts, or your favorite toppings for extra texture and flavor.
- Step 11: Refrigerate the pan for 4-6 hours to allow the dessert to set. Serve chilled and enjoy!
Tips & Variations
- Use chocolate cream Oreos for deeper chocolate flavor; vanilla cream Oreos can work for a lighter taste.
- Room temperature cream cheese blends more smoothly into the pudding layers.
- Try swapping peanut butter for almond butter for a different nutty twist.
- Adding a sprinkle of sea salt on top balances the sweetness and enhances flavor.
Storage
Store this dessert covered in the refrigerator for up to 3 days. Keep it chilled to maintain the layers’ texture and freshness. When ready to serve, no reheating is needed—just slice and enjoy cold for the best taste and consistency.
How to Serve
Serve this delicious recipe with your favorite sides.
FAQs
Can I use a different type of cookie instead of Oreos?
Yes, you can substitute Oreos with other chocolate sandwich cookies or even crushed graham crackers for a different texture and flavor.
Is it necessary to chill the dessert for 4-6 hours?
Chilling is important as it allows the pudding layers to fully set and for the flavors to meld, giving you the best texture and taste experience.
PrintNo Bake Chocolate Peanut Butter Oreo Dessert Recipe

This No Bake Chocolate Peanut Butter Oreo Dessert is a luscious layered treat combining crushed Oreos, creamy peanut butter, rich chocolate, and smooth whipped topping. Perfect for those craving an indulgent dessert without the oven, it features layers of Oreo crumbs, peanut butter pudding, chocolate pudding, and whipped topping chilled to creamy perfection.
- Prep Time: 20 minutes
- Cook Time: 0 minutes
- Total Time: 4 hours 20 minutes (including chilling time)
- Yield: 12 servings 1x
- Category: Dessert
- Method: No-Cook
- Cuisine: American
Ingredients
Oreo Crust Layer
- 1 pkg Oreos (14.3 oz package, chocolate cream)
Chocolate Layer
- 12 oz milk chocolate chips, divided (6 oz for melting, 6 oz for garnish)
- 1 1/2 cups milk
- 8 oz cream cheese (room temperature)
- 1 box Instant Chocolate Pudding mix (3.4 oz box)
Peanut Butter Layer
- 8 oz cream cheese (room temperature)
- 1 box Instant Vanilla Pudding mix (3.4 oz box)
- 1 cup creamy peanut butter
- 1 3/4 cups milk
Topping
- 12 oz whipped topping
- Optional garnish: chocolate chips, shaved chocolate, peanuts, etc.
Instructions
- Crush Oreos: In a food processor, pulse the entire package of Oreos until they become fine crumbs. Set these crumbs aside for layering.
- Melt Chocolate: In a small bowl, combine 6 oz of the milk chocolate chips with 1/4 cup milk. Microwave in short intervals, stirring until the chocolate chips are fully melted and smooth. Allow this chocolate sauce to cool.
- Create Oreo Base: Spread one-third of the crushed Oreo crumbs evenly over the bottom of a 9×13 inch pan. Use a fork to press down and create a firm, even layer.
- Prepare Peanut Butter Layer: In a medium bowl, beat 8 oz of cream cheese with a mixer until smooth. Add the vanilla pudding mix and peanut butter, mixing until fully combined. Slowly add 1 3/4 cups milk while continuing to mix until smooth and creamy. Spread this peanut butter mixture evenly over the Oreo crumb layer.
- Add Second Oreo Layer: Sprinkle another one-third of the Oreo crumb mixture evenly over the peanut butter layer.
- Prepare Chocolate Layer: In another medium bowl, beat the remaining 8 oz cream cheese until smooth. Add the chocolate pudding mix, the cooled melted chocolate sauce, and 1 1/2 cups milk. Beat thoroughly until smooth and creamy. Spread this chocolate mixture evenly over the Oreo crumb layer.
- Add Final Oreo Layer: Spread the last one-third of the Oreo crumbs evenly over the chocolate layer.
- Top with Whipped Topping: Evenly spread the whipped topping over the final Oreo layer to finish the dessert.
- Optional Garnish: Sprinkle the remaining 6 oz of chocolate chips, shaved chocolate, peanuts, or other toppings of your choice on top for decoration.
- Chill: Place the dessert in the refrigerator and allow it to chill for 4-6 hours until fully set and firm.
- Serve: Cut into squares and serve chilled. Enjoy your decadent, no-bake dessert!
Notes
- Use room temperature cream cheese to ensure smooth mixing without lumps.
- Chocolate cream Oreos are recommended for richer flavor, but any Oreo variety can be used.
- The dessert must chill for at least 4 hours to set properly; overnight chilling enhances flavor melding.
- Substitute peanut butter with almond or other nut butters for variation.
- For softer chocolate topping, ensure the melted chocolate has cooled before mixing with pudding.
- Store leftovers covered in the refrigerator for up to 3 days.
Keywords: No bake dessert, chocolate peanut butter dessert, Oreo dessert, layered pudding dessert, easy no bake recipe