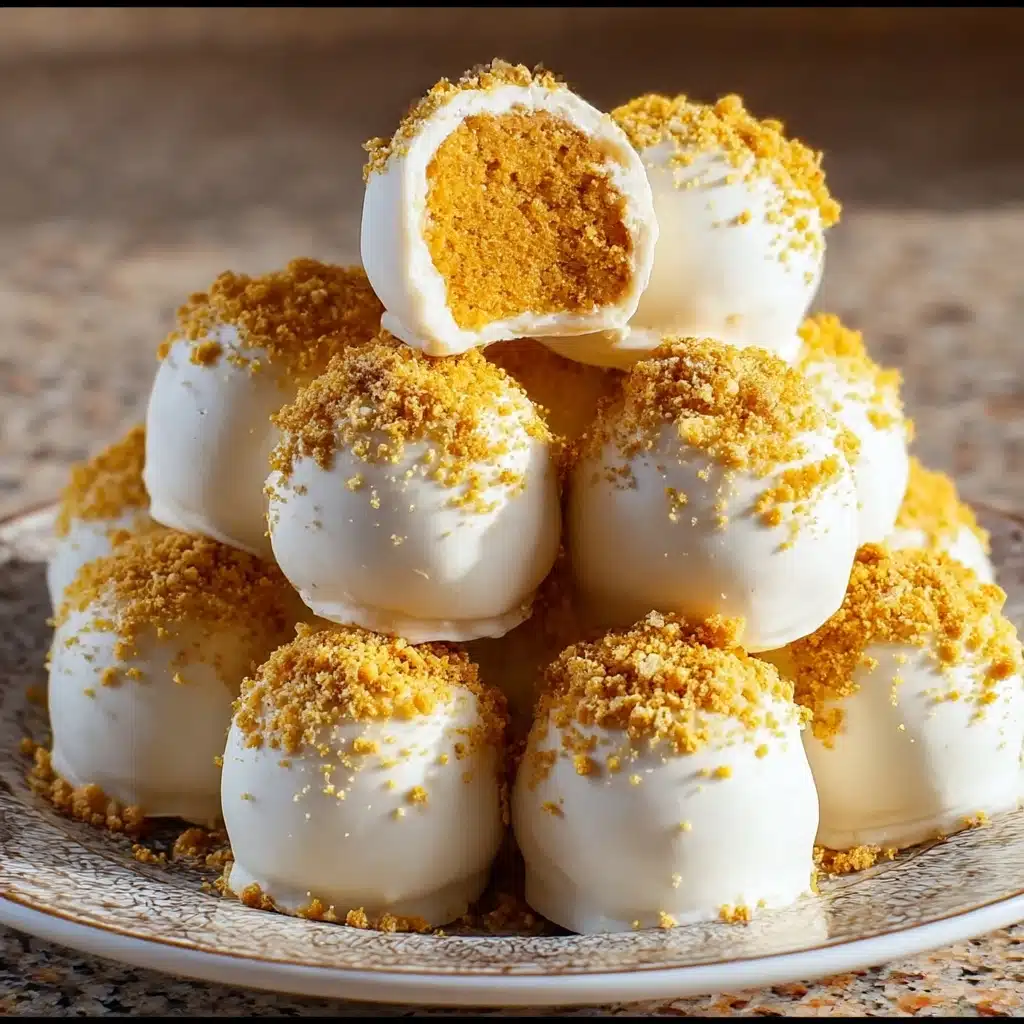
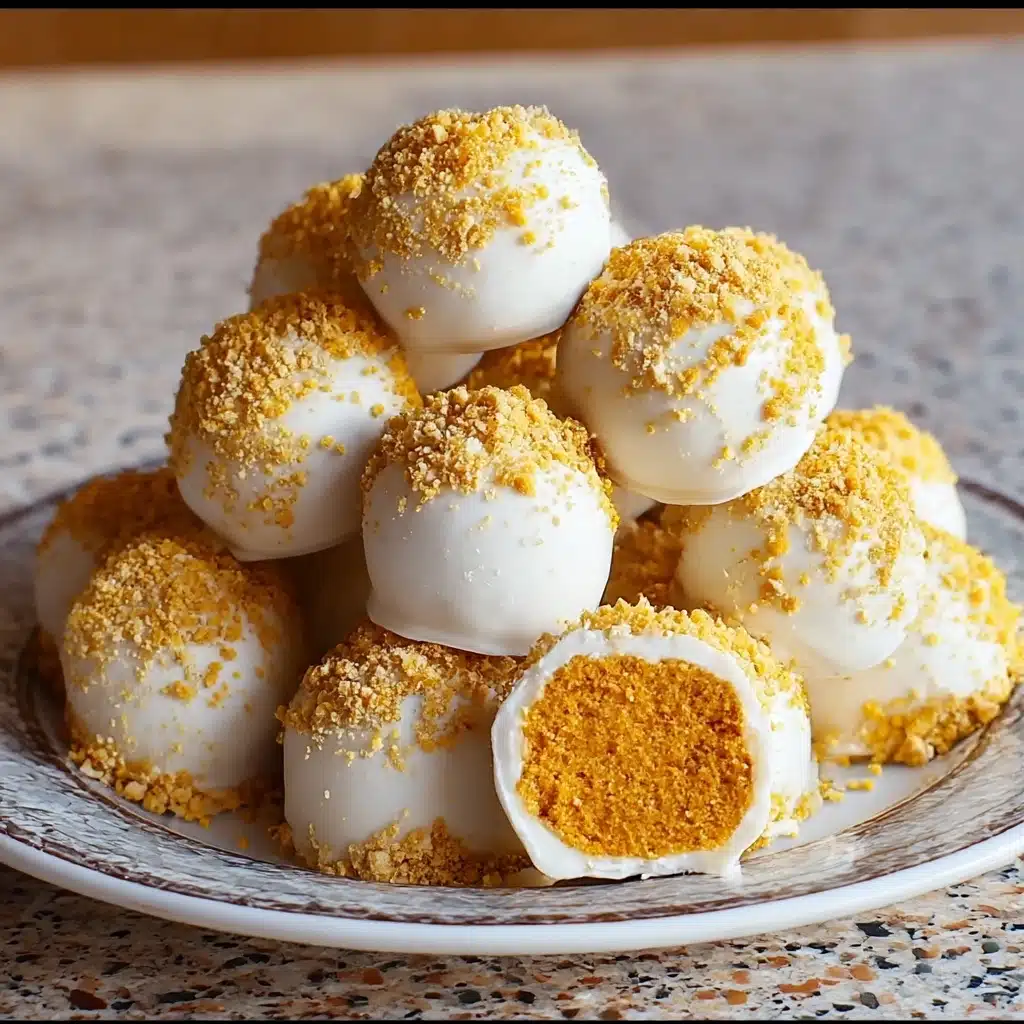
Easy No Bake Pumpkin Cheesecake Balls Recipe
If you are craving a simple yet irresistibly delicious fall treat, the Easy No Bake Pumpkin Cheesecake Balls Recipe will quickly become your new favorite. These bite-sized delights combine creamy pumpkin-spiced cheesecake goodness with a crunchy graham cracker exterior, all covered in luscious chocolate. Perfect for cozy evenings, parties, or just an anytime indulgence, this recipe offers irresistible flavors without heating up your oven or demanding hours of prep. Once you make these, you’ll wonder how you ever lived without these seasonal sweets!
Ingredients You’ll Need
Getting started with this Easy No Bake Pumpkin Cheesecake Balls Recipe is a breeze because the ingredients are straightforward but essential. Each one plays a vital role in creating the perfect balance of creamy, spicy, and crunchy textures that make these treats so memorable.
- Cream cheese (8 oz, softened): Provides a smooth, rich base that’s key to the cheesecake texture.
- Canned pumpkin puree (1 cup): Adds that classic pumpkin flavor and moisture to the mixture.
- Powdered sugar (1 cup): Sweetens the mixture delicately while blending seamlessly.
- Vanilla extract (1 tsp): Gives a warm undertone that complements the pumpkin spices.
- Ground cinnamon (1 tsp): Brings out the quintessential fall spice aroma and taste.
- Ground nutmeg (1/2 tsp): Adds depth with a subtle, nutty warmth.
- Ground ginger (1/4 tsp): Offers a gentle zing that brightens the flavors.
- Pinch of ground cloves (optional): A hint of clove provides extra festive spice complexity.
- Graham cracker crumbs (2 cups): Essential for texture, they help bind the mixture and add a buttery crunch.
- Chocolate chips or candy melts (for dipping): Use white or milk chocolate to coat the balls in a sweet shell.
- Extra graham cracker crumbs or crushed nuts (optional): Perfect for rolling, offering a delightful finishing touch.
How to Make Easy No Bake Pumpkin Cheesecake Balls Recipe
Step 1: Prepare the Cheesecake Mixture
Start by taking your softened cream cheese and mixing it in a large bowl with the pumpkin puree, powdered sugar, and vanilla extract. Use a hand mixer or whisk until the texture is perfectly smooth and creamy. This rich base is where the magic begins, combining luscious pumpkin flavor and sweet cheesecake goodness in one bowl.
Step 2: Spice It Up
Next, add the ground cinnamon, nutmeg, ground ginger, and if you choose, a pinch of cloves. Stir gently but thoroughly to make sure all those warm spices are evenly incorporated. These are the essential fall flavors that give these cheesecake balls their character and depth.
Step 3: Add the Graham Cracker Crumbs
Gradually fold in the graham cracker crumbs, mixing until the mixture thickens enough to roll. Don’t worry if it feels a little soft at first—just add a bit more crumbs until it reaches a consistency where you can easily shape it into balls. The graham crumbs add a lovely body and a hint of buttery crunch.
Step 4: Shape the Balls
Using a tablespoon or cookie scoop, portion the mixture and roll each into a bite-sized ball. Placing them onto a parchment-lined baking sheet helps keep things neat. This step is fun and satisfying—you’re literally shaping little bites of pure joy!
Step 5: Chill to Firm
Put the tray of cheesecake balls in the refrigerator for at least 1 hour. This chill time allows the flavors to meld and the mixture to firm up, making the next steps easier and neater when dipping in chocolate.
Step 6: Melt the Chocolate
While the balls chill, gently melt your choice of chocolate chips or candy melts in a microwave-safe bowl. Microwave in 30-second intervals, stirring each time to ensure the chocolate becomes smooth without burning. Patience here rewards you with that perfectly silky coating.
Step 7: Dip the Cheesecake Balls
Once chilled and firm, dip each cheesecake ball into the melted chocolate using a fork or dipping tool. Let the excess chocolate drip back into the bowl to avoid mess, then carefully place the balls back onto your parchment-lined tray. This chocolate layer is the dreamy finishing touch everyone will love.
Step 8: Add Optional Coating
If you want to go the extra mile, roll your chocolate-dipped cheesecake balls into extra graham cracker crumbs, crushed nuts, or sprinkles before the chocolate sets. This adds extra texture and makes them look extra festive for sharing or gifting.
Step 9: Final Chill
Refrigerate the dipped cheesecake balls again for about 30 minutes to allow the chocolate to fully harden. This step helps them hold their shape and makes them easier to handle when serving or packing away.
Step 10: Serve and Enjoy
Now the moment you’ve been waiting for—serve these delightful no bake pumpkin cheesecake balls chilled and enjoy the perfect balance of creamy, spiced, and chocolate-covered goodness straight from your kitchen! They’re guaranteed to impress and satisfy all those pumpkin cravings.
How to Serve Easy No Bake Pumpkin Cheesecake Balls Recipe
Garnishes
Sprinkling these cheesecake balls with a light dusting of cinnamon, a few crushed nuts, or some festive autumn-colored sprinkles really elevates the presentation and adds a pop of color and texture that’s even more inviting.
Side Dishes
Pair your pumpkin cheesecake balls with a warm cup of spiced apple cider or a cozy latte for an autumn-inspired snack time. They’re also a delightful addition to dessert platters alongside pumpkin pie or gingerbread cookies for holiday gatherings.
Creative Ways to Present
Try serving these treats in mini cupcake liners or arrange them on decorative fall-themed platters. Wrapping a few in cellophane with a ribbon makes for charming homemade gifts that friends and family will cherish.
Make Ahead and Storage
Storing Leftovers
If you happen to have leftovers—and believe me, that could happen—store them in an airtight container in the refrigerator. They will stay fresh and delicious for up to 5 days, making them perfect for quick grab-and-go treats.
Freezing
You can freeze the uncoated cheesecake balls for up to 3 months. When you’re ready to enjoy, thaw them overnight in the fridge, then dip in chocolate just before serving. This helps maintain their creamy texture and fresh flavor. Chocolate-coated balls are best eaten fresh to keep their perfect snap.
Reheating
Since these are no bake and served chilled, reheating isn’t necessary. Simply take them out of the fridge a few minutes before serving to let the flavors shine through without being too cold.
FAQs
Can I Make These Pumpkin Cheesecake Balls Ahead of Time?
Absolutely! You can prepare and roll the cheesecake balls and store them in the refrigerator for up to 2 days before dipping in chocolate. Chocolate them right before serving to keep the best texture and taste.
What Can I Use Instead of Cream Cheese?
For a non-dairy option, dairy-free cream cheese or cashew cream works wonderfully. Just make sure it’s softened so it blends smoothly with the other ingredients.
How Should I Store Leftovers?
Keep leftovers in an airtight container in the refrigerator for up to 5 days. Enjoy them chilled whenever a sweet pumpkin fix strikes your fancy.
Can I Freeze the Cheesecake Balls?
Yes! Freeze uncoated balls for up to 3 months and thaw before chocolate dipping. Chocolate-coated versions don’t freeze well but are delicious fresh.
Can I Use Different Types of Chocolate for Dipping?
Definitely! Feel free to use dark chocolate, white chocolate, or milk chocolate chips, or candy melts—whichever you prefer or have on hand. Each different chocolate will bring its unique flavor to the final bite.
Final Thoughts
There is something truly special about sharing bite-sized pumpkin cheesecake treats that require zero baking but deliver big on flavor. I hope you find just as much joy making and eating this Easy No Bake Pumpkin Cheesecake Balls Recipe as I do. It’s a recipe that brings warmth and sweetness to any occasion without hassle—so go ahead, dive in and savor every delicious bite!
PrintEasy No Bake Pumpkin Cheesecake Balls Recipe
These Easy No Bake Pumpkin Cheesecake Balls are a perfect fall treat that combines creamy pumpkin-flavored cheesecake with the crunch of graham crackers, dipped in rich chocolate. Ready in just about 2 hours, these bite-sized desserts are perfect for parties, holiday gatherings, or a cozy night in.
- Prep Time: 20 minutes
- Cook Time: 0 minutes
- Total Time: 2 hours (including chilling)
- Yield: Approximately 24 cheesecake balls 1x
- Category: Dessert
- Method: No Bake, Chilling
- Cuisine: American
- Diet: Vegetarian
Ingredients
For the Cheesecake Mixture:
- 8 oz (225 g) cream cheese, softened
- 1 cup canned pumpkin puree
- 1 cup powdered sugar
- 1 tsp vanilla extract
- 1 tsp ground cinnamon
- 1/2 tsp ground nutmeg
- 1/4 tsp ground ginger
- Pinch of ground cloves (optional)
- 2 cups graham cracker crumbs
For Dipping:
- White chocolate or milk chocolate chips or candy melts (for dipping)
- Extra graham cracker crumbs or crushed nuts (for rolling, optional)
Instructions
- Prepare the Cheesecake Mixture: In a large mixing bowl, combine the softened cream cheese, pumpkin puree, powdered sugar, and vanilla extract. Use a hand mixer or a whisk to mix everything until it’s smooth and well combined.
- Spice It Up: Add the ground cinnamon, nutmeg, ginger, and optional cloves to the mixture. Stir well until all the spices are evenly incorporated into the creamy base.
- Add the Graham Cracker Crumbs: Fold in the graham cracker crumbs gradually. Mix until the mixture becomes thick enough to roll into balls. If it feels a bit too soft, add a little more graham cracker crumbs until you reach a workable consistency.
- Shape the Balls: Using a tablespoon or a cookie scoop, portion out the mixture and roll it into bite-sized balls. Place each ball onto a baking sheet lined with parchment paper.
- Chill to Firm: Once all the balls are rolled, refrigerate them for at least 1 hour to help them firm up for dipping.
- Melt the Chocolate: In a microwave-safe bowl, melt the chocolate chips or candy melts. Heat in 30-second intervals, stirring after each until completely smooth and melted. Be patient to avoid burning the chocolate.
- Dip the Cheesecake Balls: Using a fork or dipping tool, carefully dip each chilled cheesecake ball into the melted chocolate. Let any excess chocolate drip back into the bowl before placing them back on the lined baking sheet.
- Add Optional Coating: Roll the chocolate-coated balls in extra graham cracker crumbs, crushed nuts, or sprinkles before the chocolate sets, if desired.
- Final Chill: Refrigerate the chocolate-dipped balls for about 30 minutes or until the chocolate is firm, helping them stay intact when serving.
- Serve and Enjoy: Serve chilled and enjoy these delightful treats. Store leftovers in an airtight container in the refrigerator for up to 5 days.
Notes
- You can prepare and roll the cheesecake balls up to 2 days ahead and refrigerate before dipping in chocolate.
- For a dairy-free option, substitute cream cheese with a non-dairy cream cheese or cashew cream, softened for easy mixing.
- Leftovers keep well refrigerated in an airtight container for up to 5 days.
- You can freeze uncoated cheesecake balls for up to 3 months; thaw overnight in the refrigerator before coating.
- Be careful when melting chocolate to prevent burning by heating in short intervals and stirring frequently.
Nutrition
- Serving Size: 2 cheesecake balls (approx. 40g)
- Calories: 160
- Sugar: 13g
- Sodium: 110mg
- Fat: 9g
- Saturated Fat: 5g
- Unsaturated Fat: 3g
- Trans Fat: 0g
- Carbohydrates: 18g
- Fiber: 1g
- Protein: 2g
- Cholesterol: 30mg
Keywords: pumpkin cheesecake balls, no bake pumpkin dessert, fall recipes, pumpkin treats, easy pumpkin dessert, no bake cheesecake bites, holiday desserts